

Click on the loco to go back to the 25NC home page
25NC Frame
The 25NC was a product of the end of steam and as such was built using the best ideas from around the world. One such was the cast steel bed, developed in the states. This means the whole locomotive frame is one piece from front to back. Including the cylinders as well as all frame bracketry. Indeed on the original prints to allow machining of the cylinders the front coupler beam had to be cut off from the casting then welded back on.
The challenge in this model is to recreate as much as possible from steel and castings to get it to look as prototypical as possible. I am not trying to make a museum model this is intended to be a working model but its always nice to add what detail you can.
So to the frames they started off as two 25mm thick black steel plates water jet cut to my drawing. The plates were then drilled and two dowel pins fitted to match them up. Just as an aside I have been asked why the frames are so thick 0.816". The reason is the inside of the frames match to holes in the original bed that allowed the spring hangers through. In retrospect I could have made them any thickness but it seemed like a good idea at the time!

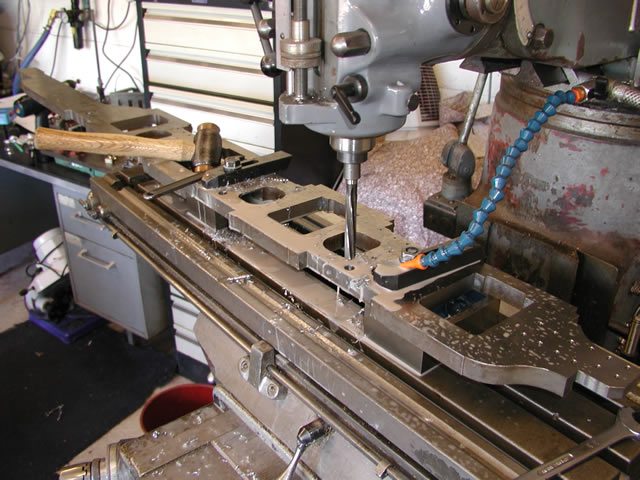
The next step was to start milling out the pedestals. I found that the digital read out was invaluable for doing all the work on the frames. Using the main driver pedestal as the datum I worked everything else off this known point. This was handy as I due to the length of the frames they had to be machined in two operations

Once the pedestals and the bottoms had been machined to give me something to work from. I then started to cut the rest of the pockets etc. in the frames. So I fitted an angle plate to the mill table and clamped the pair of frames to it. Again working away from the main driver I could get the pockets for the bracket castings done in two settings. The basic design of the frames is two sides held together by bolts. The bolts are heavily countersunk and will be filled after final bolting up. This hopefully will mimic too some extent the one piece cast original, well that's the idea.
Using the digital read out and once again working away from the main driver i started drilling all the holes. Hopefully to keep everything in line, i did most of the drilling with the frames as a matched pair. Once completed the frames were then ready to split. Then it was on to make the pedestal binders. They had been water jet cut with the frames so now needed machining. A relatively simple job using the mill.


Once all the holes had been taped the binders and frames were all bolted up and it was time for a trip to the lumsden grinders. This process involves putting the plates on a large rotating table under a grinding head. Because of the length of the frames i had a lot of trouble finding anyone who could skim the frames.


Lumsden grinding is also know as Blanchard grinding in the US' it had always been my plan to have the frames ground once the basic machine work was done. Grinding would reduce the frames from 25mm down to the scale thickness of 0"816. I just did not quite appreciate how difficult it would be to find someone to do the work. Luckily i found Pegasus Profiles Ltd., they had a machine in Thetford big enough to grind the frames, they were very helpful and managed to do the job "while i waited" . http://www.pegpro.co.uk/
I now had a number of other jobs to do on the frames while they were in two pars. The first being to cut out the clearance for the suspension balance beams. This was a pretty straight forward job just requiring some deep angled recesses to be machine in the frames


The purpose of the pocket is to allow the balance beams freedom to move up and down as the wheels go over undulations in the track. I did not do much scientific machining in these just bluing up the steel and scribing lines on at the required angle then just setting the frames over at that angle on the mill so i could mill along the lines.
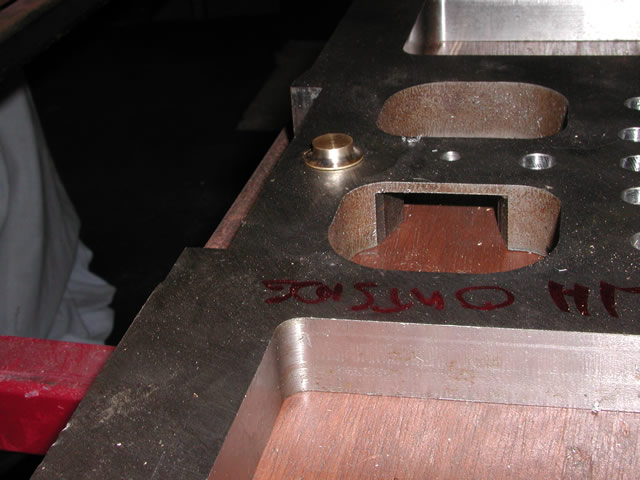
The next job was milling out the pocket's for the tongue of the cradle casting. As i have said the frame was a one piece casting that would now be made up as a number of steel, bronze and cast iron components all machined and bolted together to form the appearance of a solid one piece unit. The challenge in this is getting everything to fit together and hopefully have some form of register to fit against that would take some of the load and also provide a location to work from.
Borrowing from my days in woodworking class at school I decided to have a bit of "tongue and grove" applied to my non wood bits. So on each frame a parallel pocket would be machined into which the cradle would fit. It would then be bolted up to make one solid piece. Hopefully then the pocket taking the strain off the bolts as the cradle is a large long heavy C.I. casting.
First job was to set the frame up square from the previously machined face

Once the frame was set up square i was able to work away from it in the Y direction and touching on the edge of the axle pedestal I was also able to use that as the datum for the X direction. Once I new where i was geographically it was just a matter of touching on to the surface and machining the pockets to the correct depth.


Once the pocket had been machined I then drilled the bolt holes for securing the cradle. In this case tapping size only as I intended to use a transfer punch to get the hole centers on the cradle prior to drilling at least one locating bolt. Once I have a bolt securing the cradle to the frames it will be a simple job to transfer the rest with the punch and then drill and tap the holes..

From here on in I will be changing the format of the pages somewhat and not having the images as a clickable link. I am doing this for two reasons, one it makes it easier and quicker to code the page and secondly the page format was done originally to help people with dial up connections. Time has moved on broad band is cheaper than ever so I am going to assume your getting fed with the "fat pipe" and to my friends still on dial up sorry, things are going to be slower from now on.
The frames themselves although flat pieces of mild steel still had some protrusions that needed to be added. In this case the two items were the bosses for the brake hangers and some doubling plates for the frame suspension. This gave some relief to the outside face that would have been cost prohibitive to have been machined on in the first place.
What I was doing was adding in the bosses not machining the metal off to form the boss. So to the brake hanger bosses. They were made from round bronze bar and turned up in the lathe. On the frame I had already drilled and reamed the holes that would take these bosses.
The little bosses were a relatively easy turning job just forming the casting radiuses on the boss face.
.jpg)
.jpg)
After that the bosses were pressed into the frames and would be left until the frame cross beams are fitted. Once that is done I will drill through them to form the shaft holes for the brake hanger arm.

The last item to add to the frames was the suspension balance beam boss. I should have added these bosses when the frames were in tow halves but unfortunately they took a long time to produce. Eventually i got a small company to produce then as CNC profiles in steel, but by the time they arrived the frames were bolted together and a much more difficult task to fit than they should have been.
So eventually I decided to rivet them on using two 5BA studs, I chose 5BA as that thread is nearly spot on 1/8". So first job was to mark and drill the two 1/8 holes in the bosses.
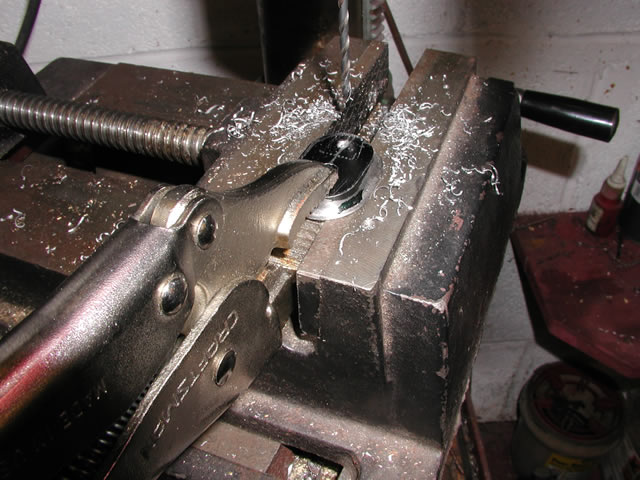
Drilling the two holes in each boss
Once I had all the holes drilled I then used a mandrill to clamp the boss to the frame, using a square to get them in line.
.jpg)
Getting the boss square of the using the pedestal as a datum
Then I transfer punched through onto the frame and then drilled and tapped the frame 5BA. Screwed in my home made rivets and pushed on the boss ready to flush rivet over.
.jpg)
Boss in place with 1/8 rivets
I then riveted over the pins to from a flush riveted boss and gave them all a buff off with a disc grinder. The results were not bad and I was now ready to drill and ream the holes for the balance beam pins
.jpg)
Buffed up ready to drill
As the frames were now bolted together it was a bit of a challenge to drill the holes. I could have done them using a pistol drill suppose but I decided to re-mount the frame on the mill. I also had to drill the frame holes for the spring hangers so it killed two birds with one set up.
.jpg)
All bosses in place ready to move onto the mill
.jpg)
Set up on the mill ready to drill
Once on the mill I used the pilot hole in the bosses to set up from and drilled and reamed the holes to suite.
.jpg)
Reaming holes on mill
Its always a bit of a conundrum when to start painting and hanging things together. I now have bits all over the place and the logical place for them to be is on the locamotive. S it has been once again time to call on the services of Clive from Scunthorpe. As I felt it was time to paint the frames and get bolting things on not hiding them in drawers
.jpg)
Masking up
.jpg)
Clive gives the workshop a coat of gray!
.jpg)
All rubbed down and ready for the top coat
.jpg)
Clive swapping over to the big gun once the hard to get parts had been flashed in
.jpg)
Applying detail coats using the small air brush handy for getting into nooks and cranny's
.jpg)
Job done and ready to harden off